Assets and media
This page is focused on the core concepts of virtual staging and how you can use it with Dynamic Media to retrieve unpublished media and assets.
With an Amplience virtual environment, assets are "pulled" from specified locations, either asset stores within Content Hub, or from the endpoint used for published assets. When a virtual environment is created, a set of rules specify where the assets should be retrieved from. This allows you to ensure your assets are always in sync between environments.
We've designed Virtual Staging to be easy to set up, flexible and provide low friction integration, so it can work with your existing workflow and offer opportunities to make it more efficient. Virtual Staging works for content requested using a browser, as well for web and native apps and ecommerce integrations. Once a VSE is created, with an easy to set up series of rules and security settings, you can just consume content uploaded to specified asset stores. With a Virtual Staging Environment (VSE) you consume content using a generated URL that points to a staging environment, to which access is controlled, instead of the production URL.
Creating a Virtual Staging EnvironmentLink copied!
Creating and managing a Virtual Staging Environment (VSE) is an administration task and it's done by a trusted user with access to the Account app or by the Amplience provisioning team at the beginning of your project. The administrator creates the VSE, specifies where the content comes from and who has access to the environment. The Account app will then generate a URL that is used to access assets in this virtual staging environment.
In most cases a virtual staging environment will be set up for you, but the information on this page will help you decide how the VSE is configured.
Video: Setting up a Virtual Staging EnvironmentLink copied!
Watch the video below for a step by step guide to setting up a VSE. The sections below explain how to set up an environment in more detail, including content selection rules and how to use consume assets from the VSE domain.
Example: Creating a VSE for a product launchLink copied!
In this example we're going to create a Virtual Staging Environment to be used to manage content for a product launch. The launch team will be working on their project in parallel with other teams who might be updating content on live site or working on other projects. The project contains commercially sensitive images, so they want to restrict access to the content before it is live.
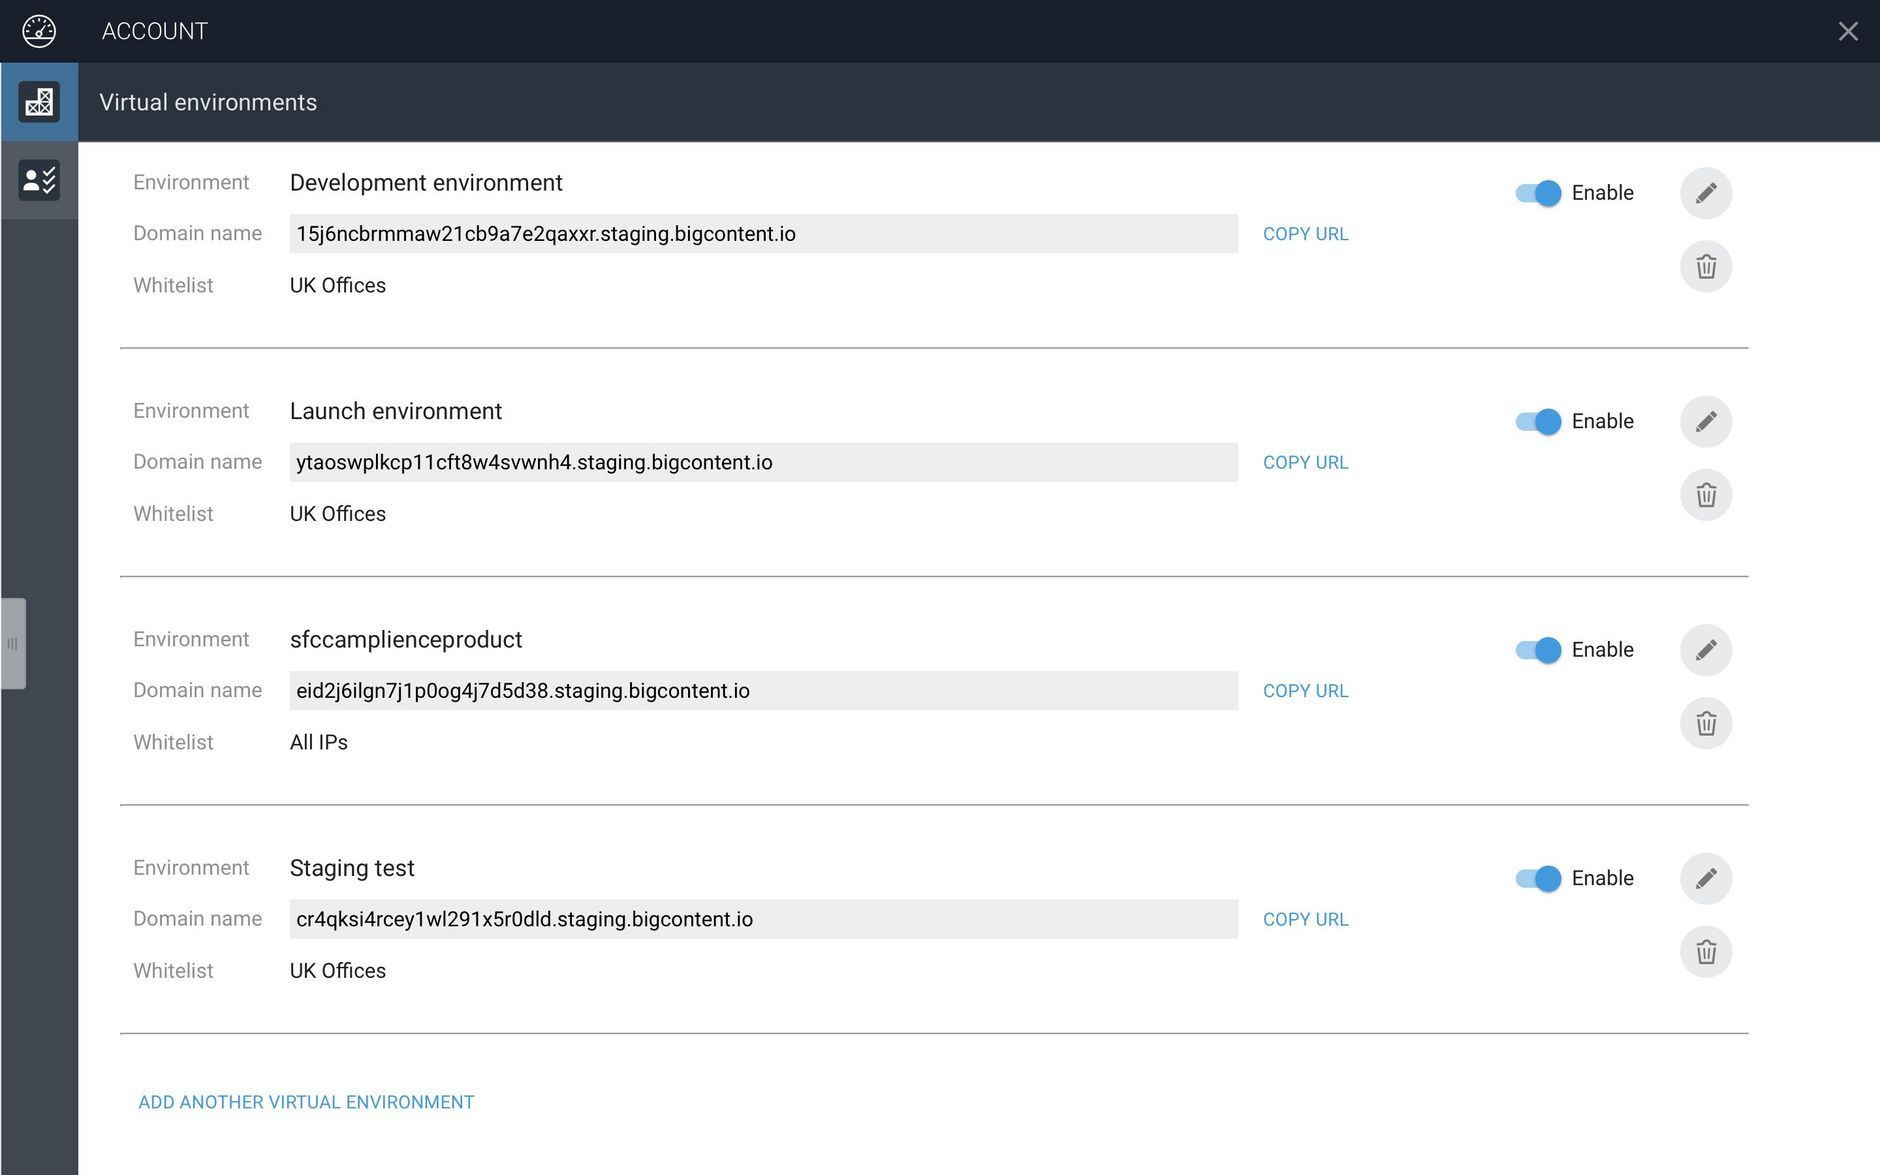
When the Account app is launched it allows you to view and edit any existing VSEs as well as to add new ones. We'll create a new VSE for the launch team and name it "Launch environment".
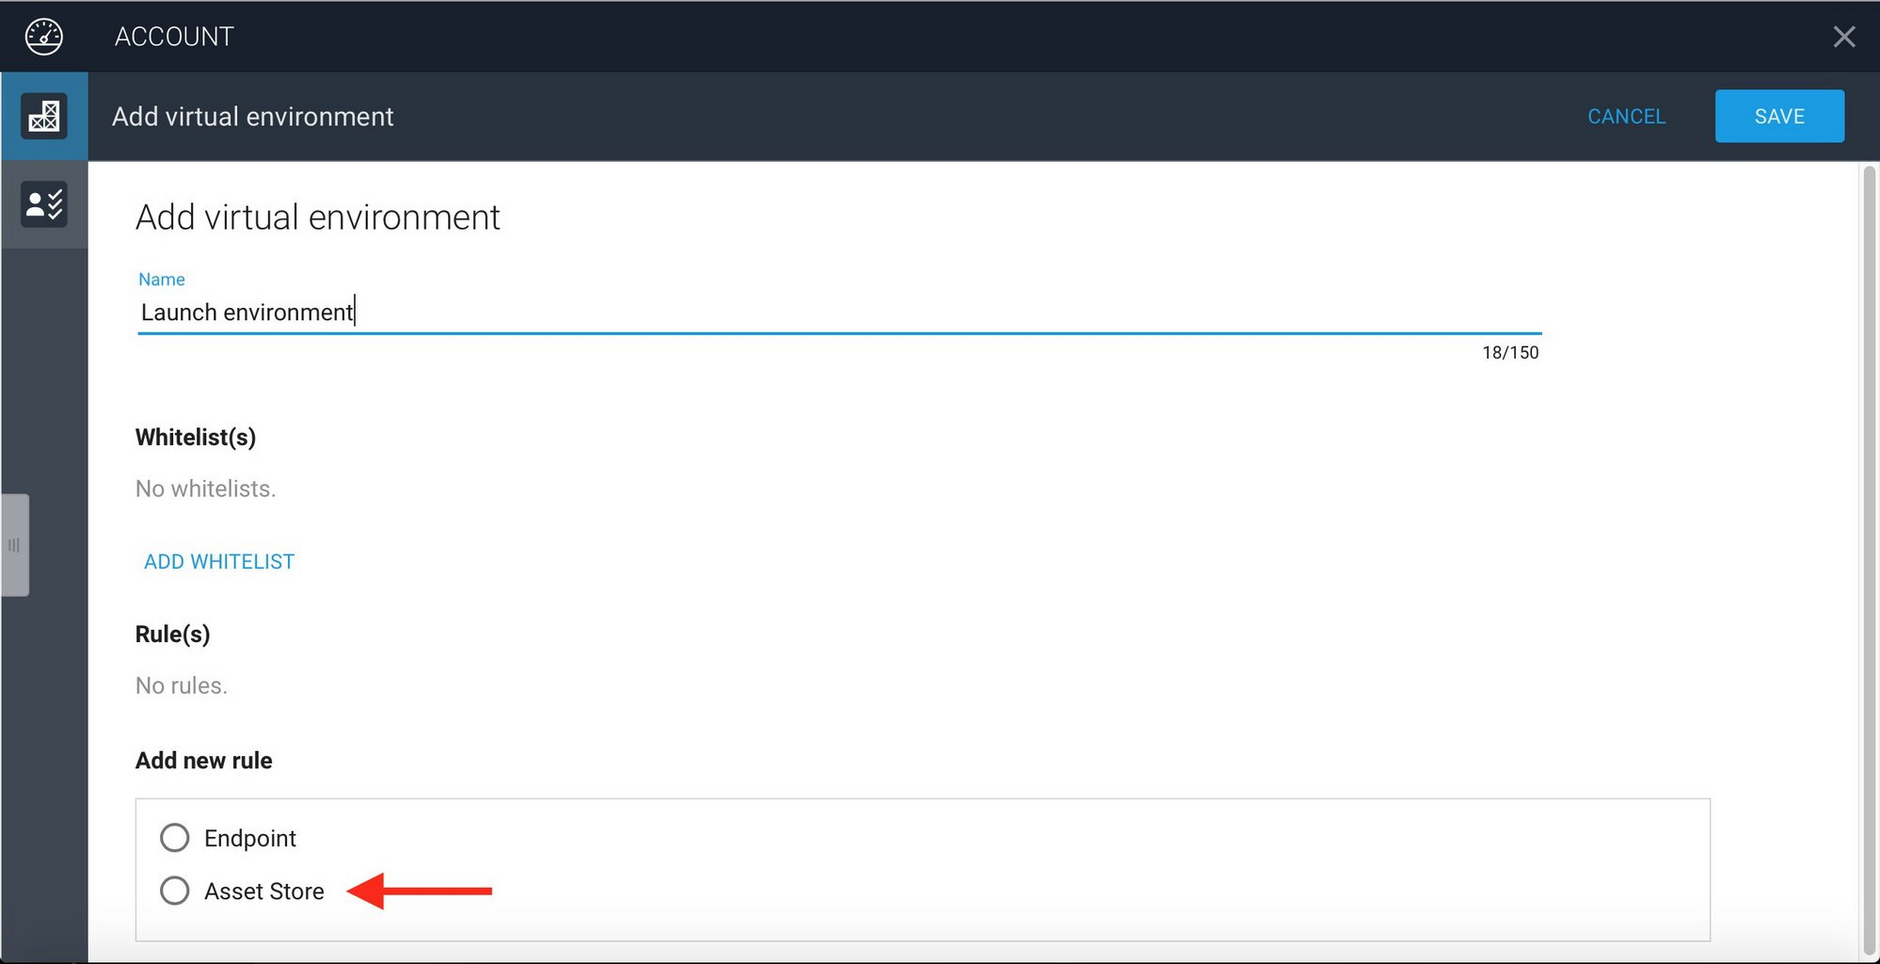
To create a new environment, launch the Account app and choose "Add another virtual environment". You can then give the new environment a name and specify the rules it uses to retrieve and control access to assets.
Content selection rulesLink copied!
An Amplience VSE works differently to traditional virtual staging environments that require users to push content to a specific location.
With an Amplience virtual environment, assets are "pulled" from specified locations, either asset stores within Content Hub, or from the endpoint used for published assets. When a virtual environment is created, a set of rules specify where the assets should be retrieved from.
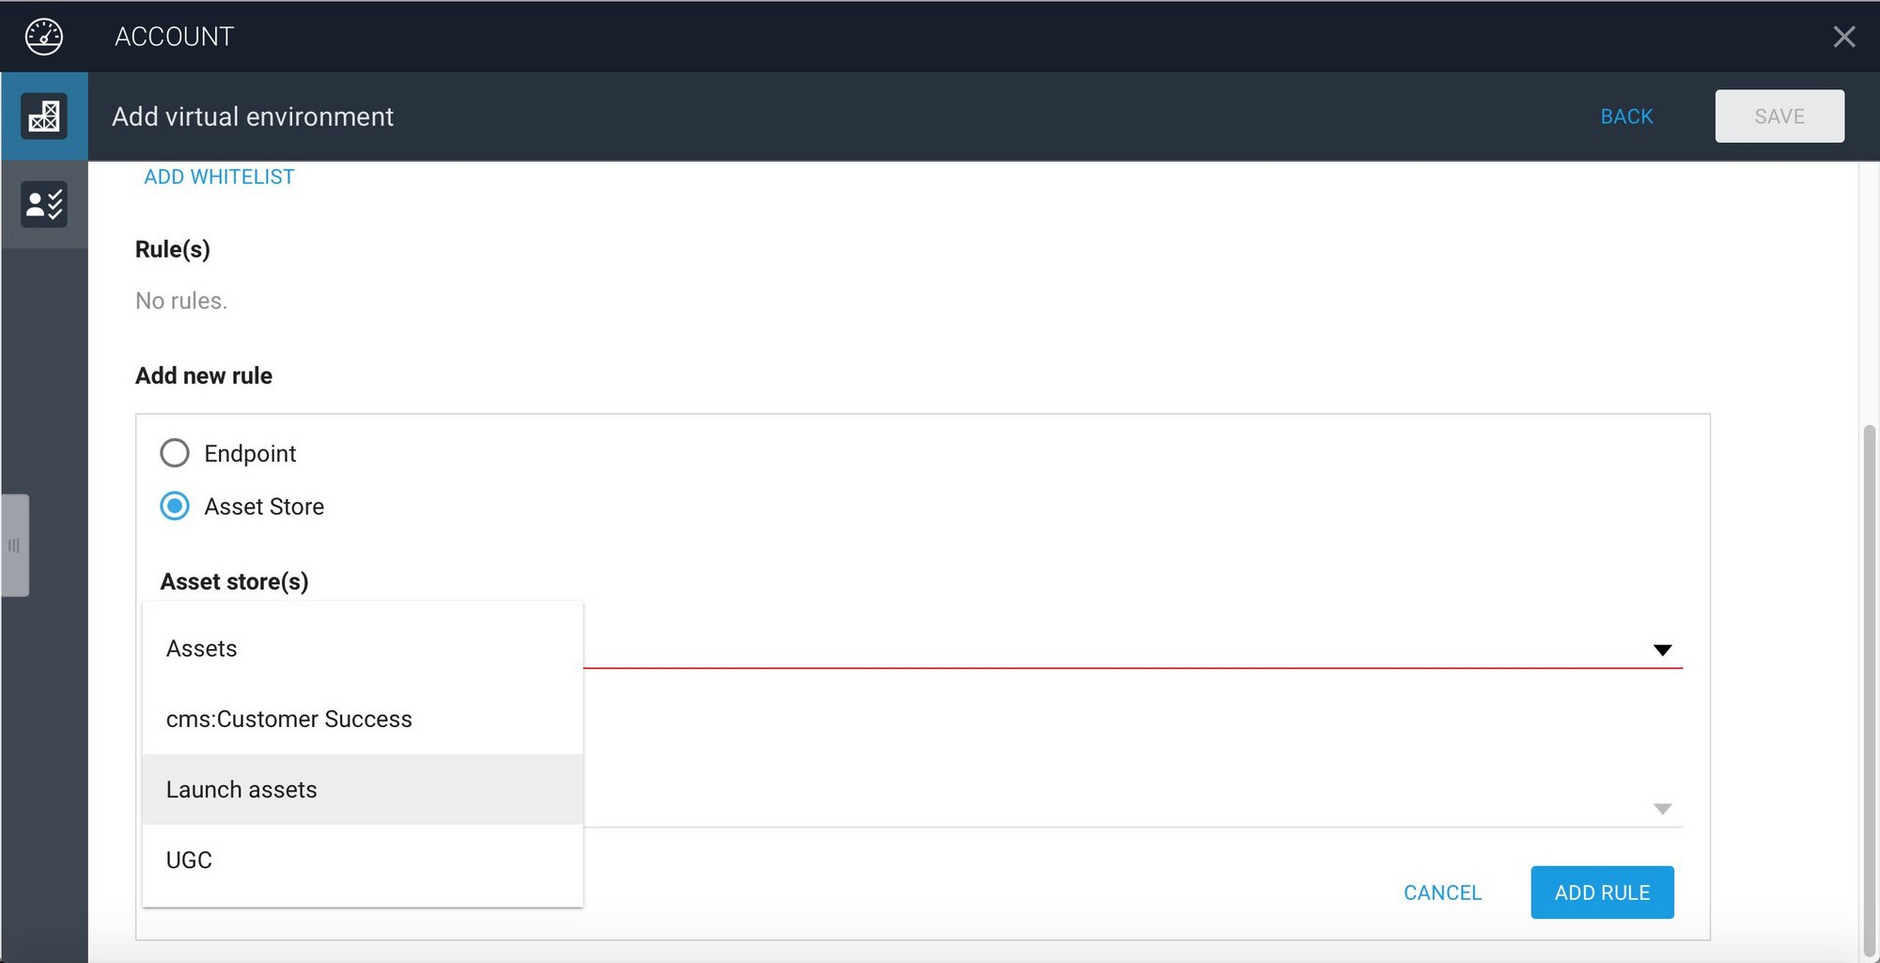
In the "Add new rule" section choose the "Asset store" radio button and click in the area below labelled "Select an asset store". The list of asset stores available to you within Content Hub will be shown.
For the "Launch environment" we specify that assets should be retrieved from the asset store named "Launch assets". If an asset is not found in "Launch assets", then the "Assets" asset store will be searched. Note that these assets are retrieved directly from the asset store in Content Hub, they do not have to be published.
To add these rules, choose "Launch assets" from the asset store list and click the "Add Rule" button. Then add the other asset stores you want to include in the order in which they should be searched.
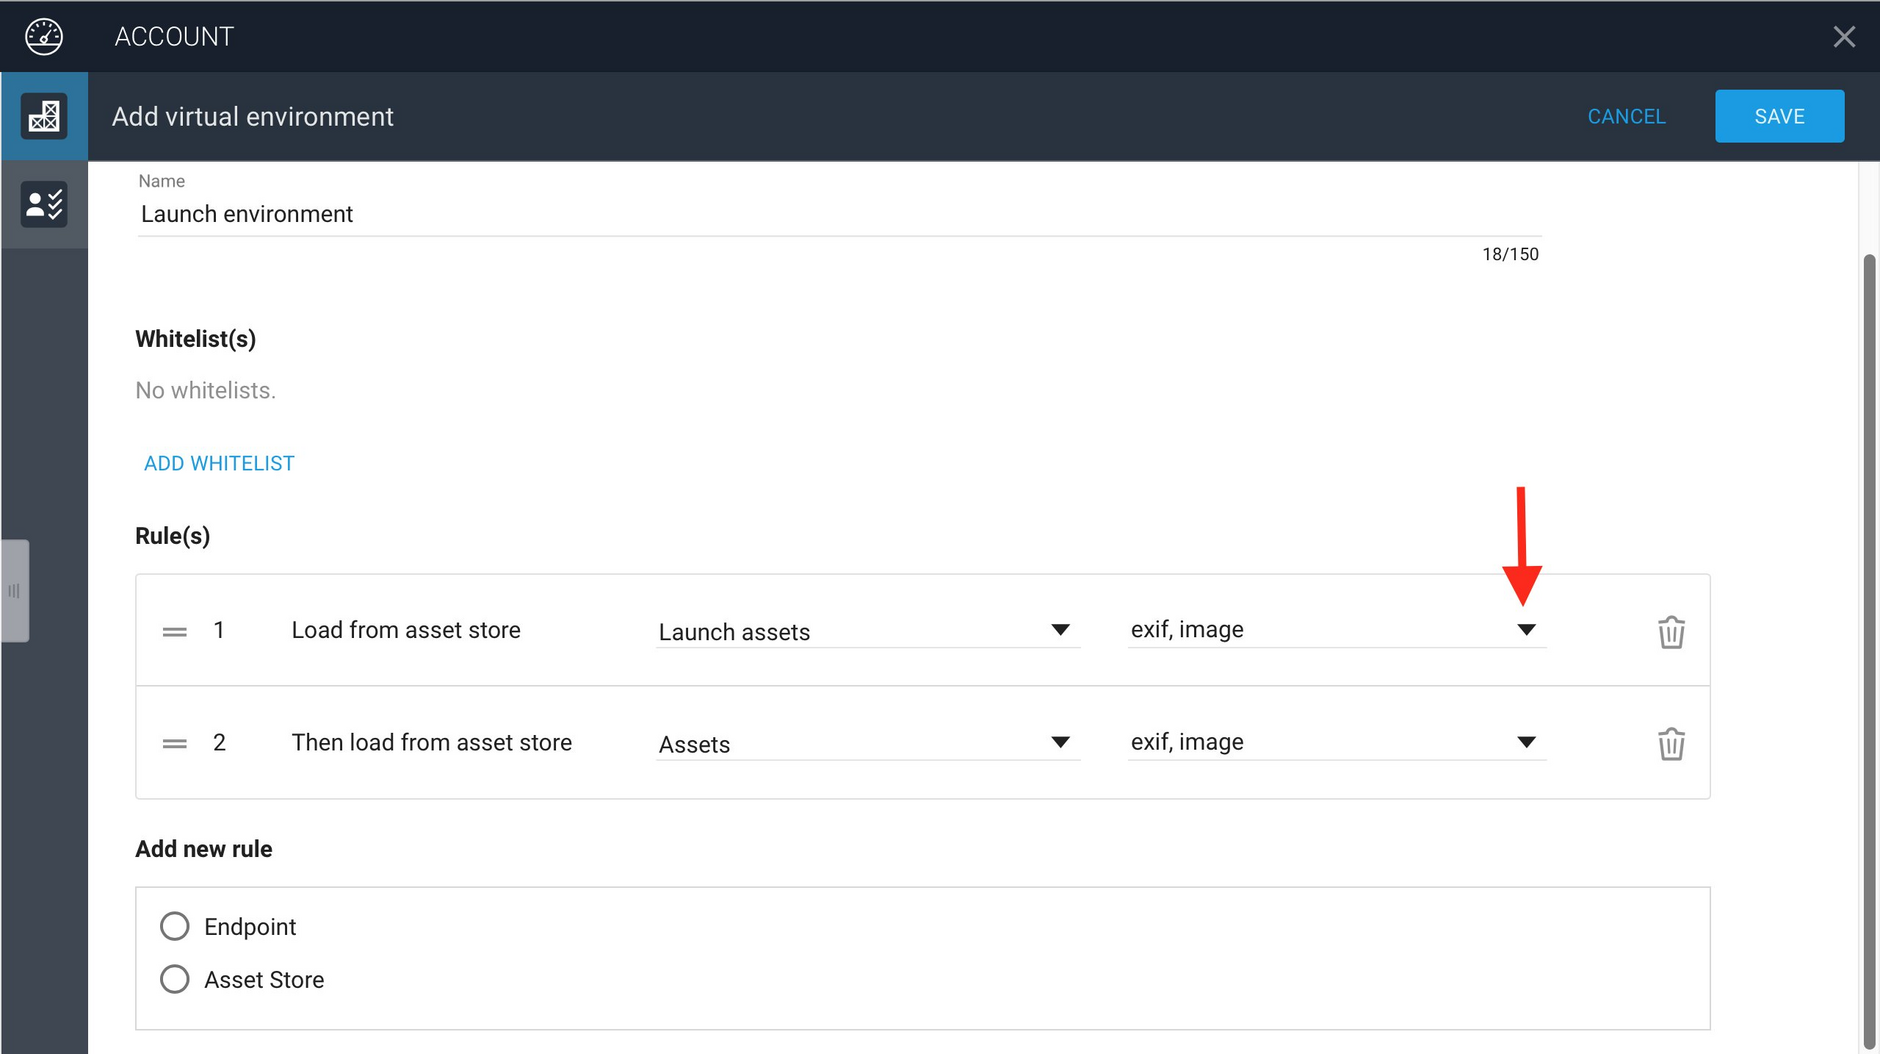
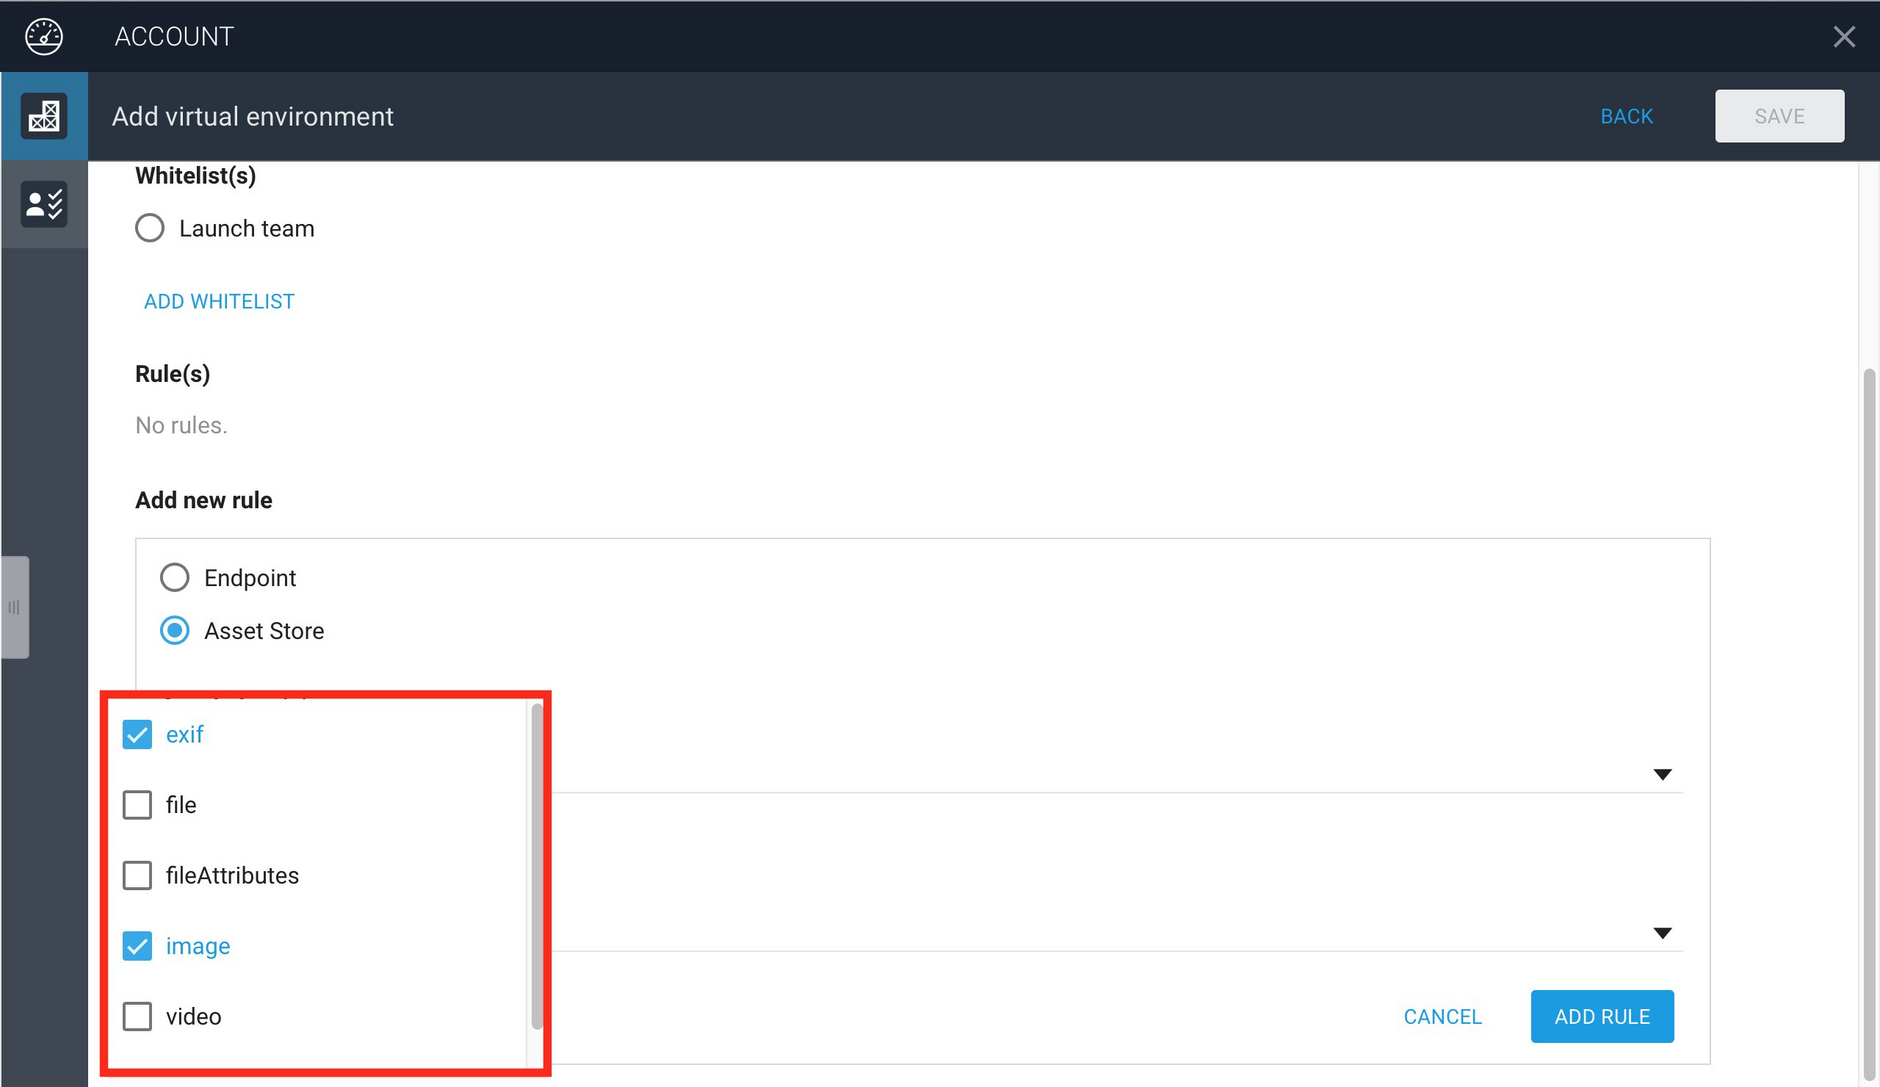
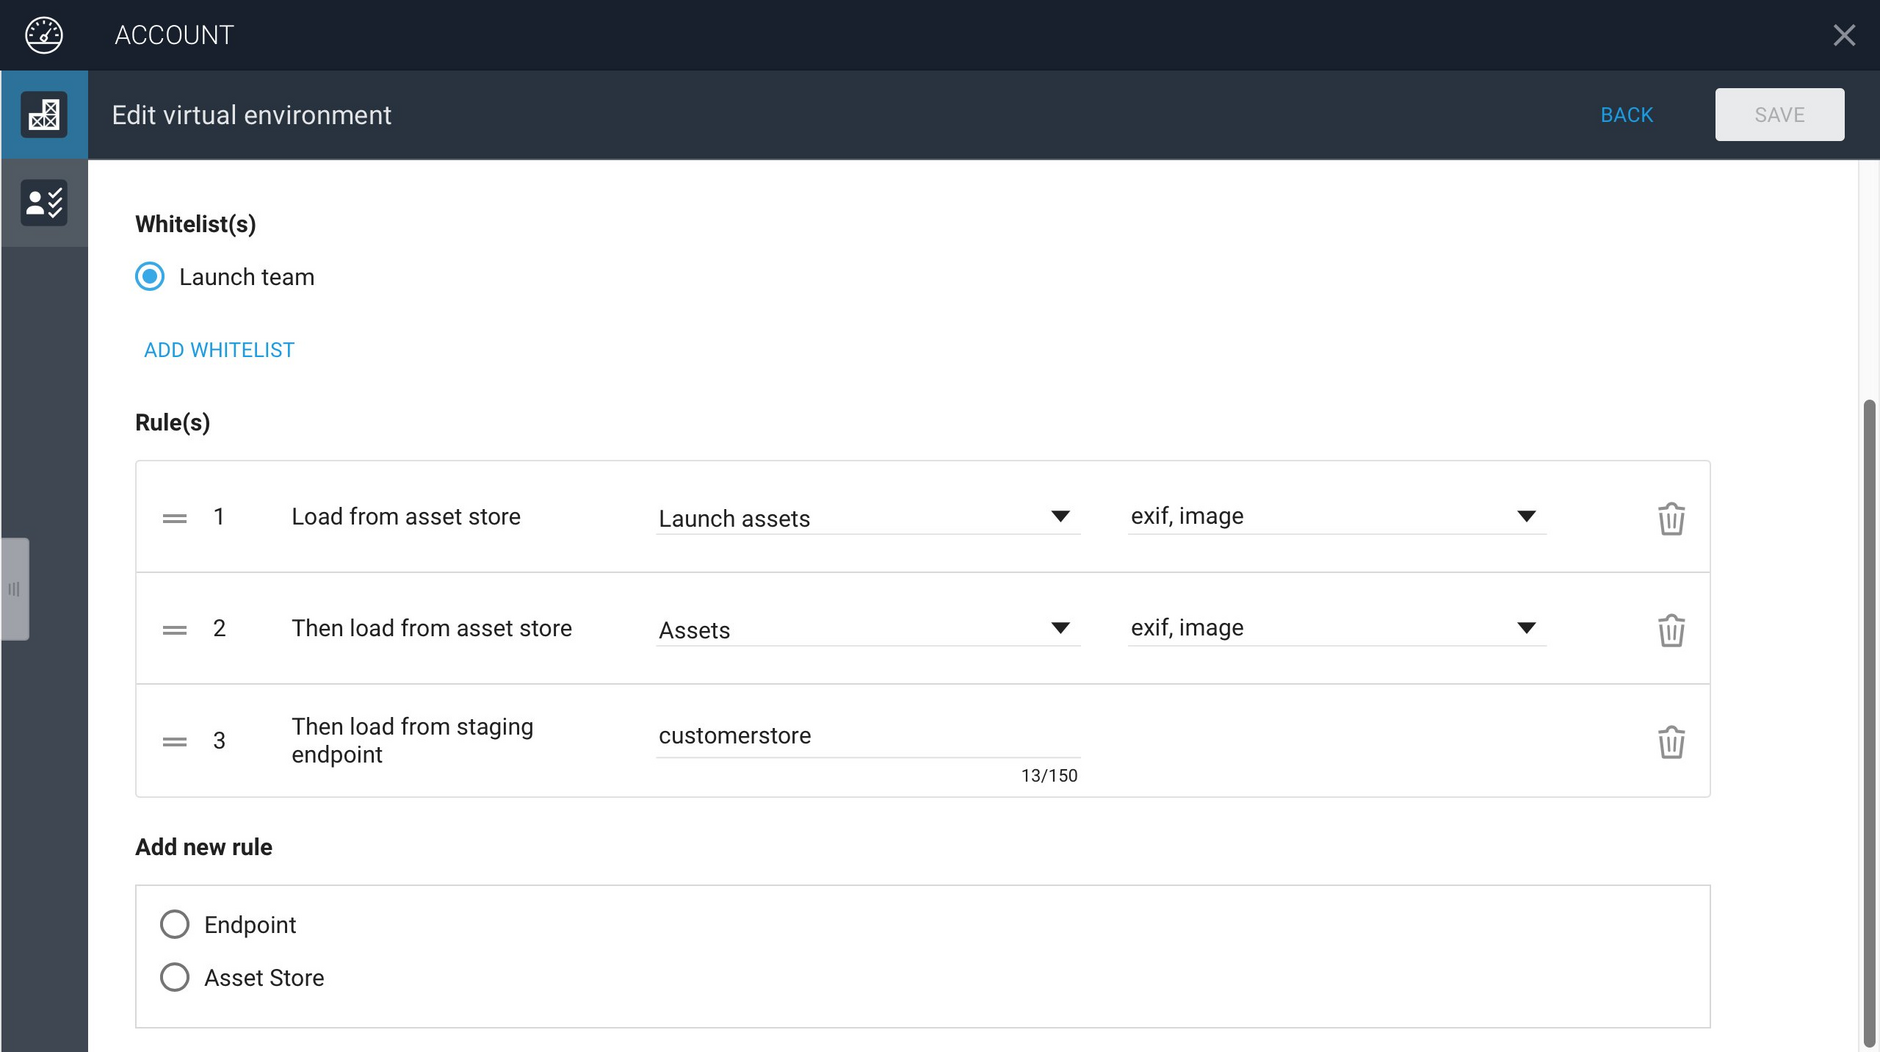
The image below shows the rules we have added. For each asset store that is specified, it is also possible to add the metadata schemas that are supported. To choose which metadata schemas should be included, select the popup menu to the right of the asset store name and select the schemas you want to include.
If a metadata schema is not included in the list, then this metadata cannot be retrieved from the asset in the VSE. In this example, we want to be able to access the exif and image metadata for assets in this virtual environment, but you might also have a custom schema that you want to include.
Specifying only those metadata schemas that you want to include is a security feature, since we only want to make data available that you want to be.
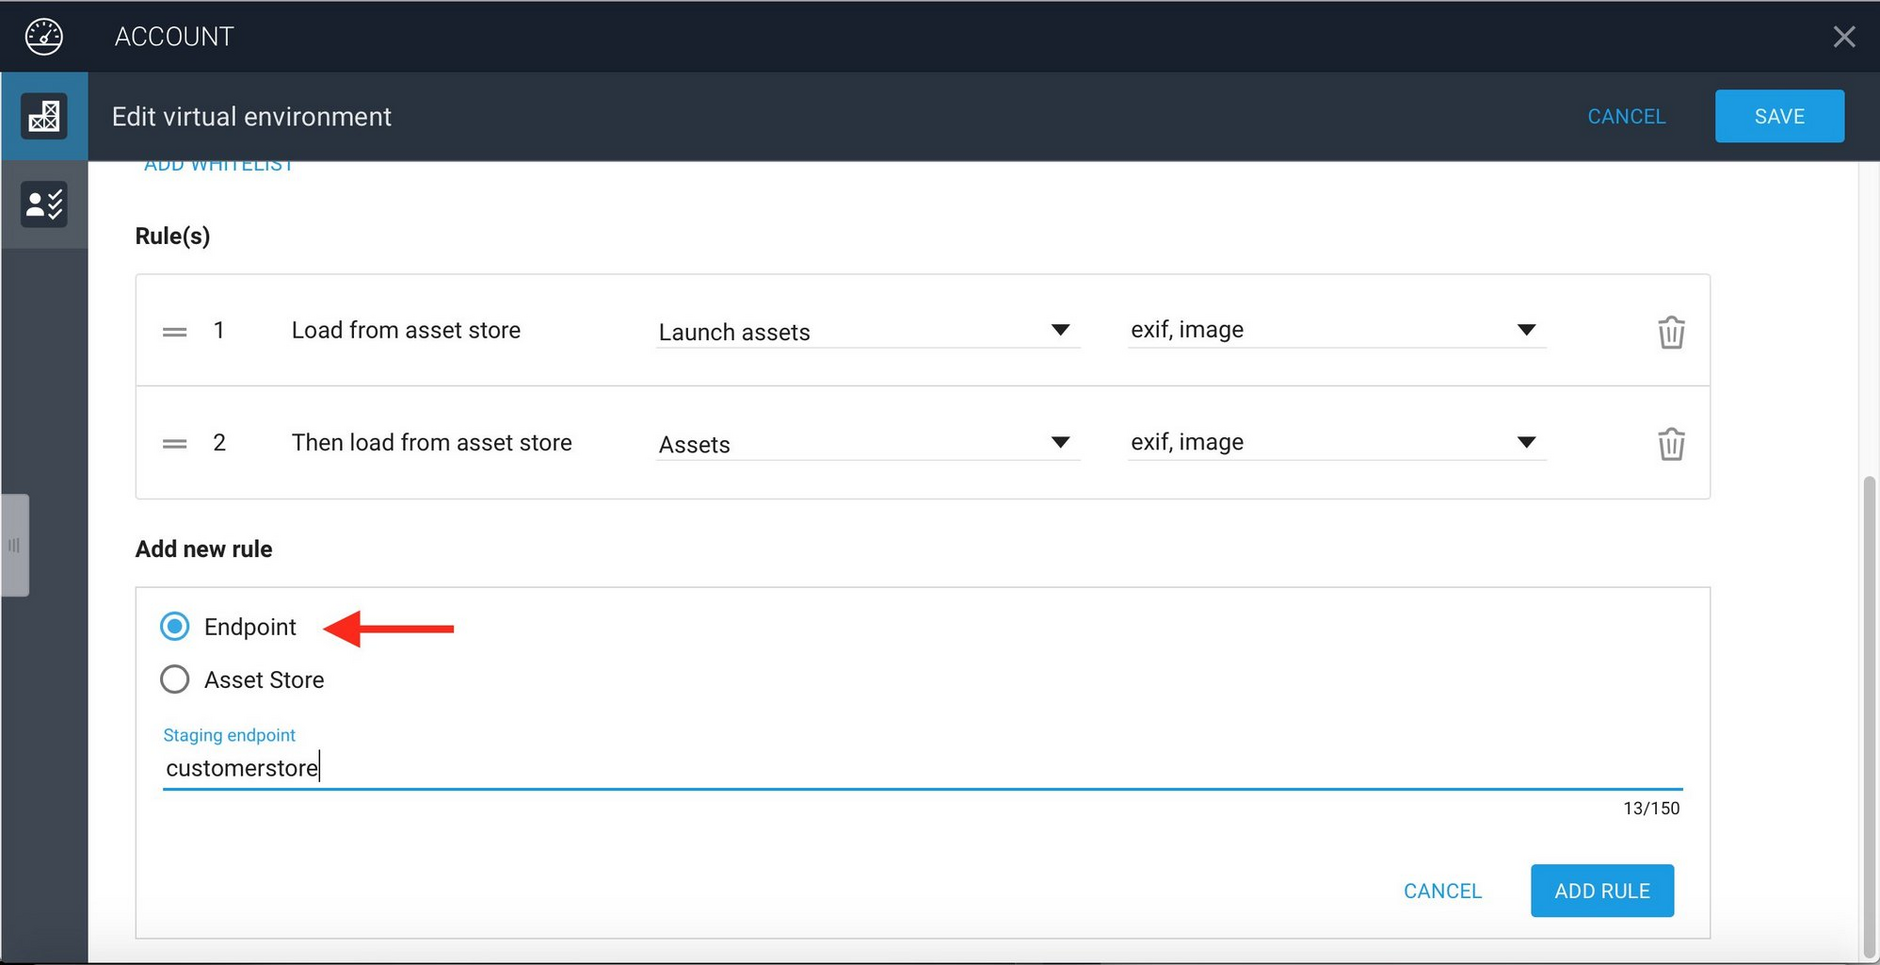
In many cases you will want to include the published version of an asset if it cannot be retrieved from one of the specified asset stores. This will often be the case if you are updating a site and not all the assets will be updated. To add an endpoint, click the "Endpoint" radio control, enter the endpoint name and click the "Add Rule" button.
In this example we publish assets to an end point called "customerstore".
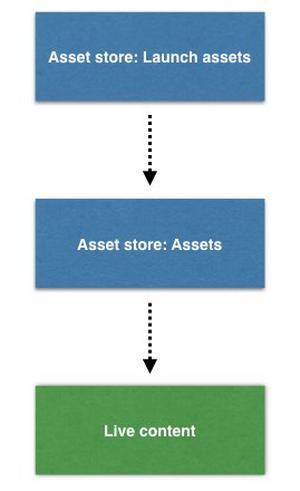
Given a staging URL for an asset, the asset will first be looked for in the "Launch assets" store, followed by "Assets" and finally the endpoint used for published assets.
The rules for the Launch environment, including the endpoint rule is displayed in the Account app as follows.
Before the virtual environment can be created you need to specify a "white list". This is used to control access to this particular virtual staging environment. White lists are discussed in security. For now let's assume a white list has already been created called "Launch team". With all the rules filled in and the white list specified, the virtual environment can now be created.
The Virtual Environment URLLink copied!
When you click Save to generate a virtual environment it will generate a domain name, consisting of a random number and the staging domain, for example:
This URL is then used to access assets within this virtual environment.
For example, if your live content is published at the endpoint "customerstore", then the URL for accessing an asset called "pineapple-sunglasses" in the "Launch environment" virtual environment would be:
https://ytaoswplkcp11cft8w4svwnh4.staging.bigcontent.io/i/customerstore/pineapple-sunglasses
Given this asset URL, the staging service will do the following:
-
Check that the requesting IP address is included in the white list for the virtual environment at
ytaoswplkcp11cft8w4svwnh4 -
Try loading the asset from the "Launch assets" asset store
-
If it's not found, try retrieving the asset from the "Assets" asset store
-
If it's still not found then it will try to load the asset from the "customerstore" endpoint. This will be the published asset
You can use this URL to access services such as Dynamic Media as normal, to create a thumbnail from the image, for example. See the video below for an example of consuming assets in a virtual staging environment.
Video: Consuming Assets in Virtual StagingLink copied!
Workflow Using Virtual StagingLink copied!
Virtual staging environments are designed to support a wide range of different workflows and business rules.
Watch the video below to see how Virtual Staging can fit in with your workflow. More examples of how your workflow can be enhanced are explained in more detail below.
Video: Using Virtual Staging to enhance your workflowLink copied!
Asset LifecycleLink copied!
In the example of the "Launch environment" introduced in creating a virtual staging environment, the lifecycle of assets would typically be as follows:
-
The assets for the launch project are uploaded to the "Launch assets" asset store in Content Hub. Only authorised users would be able to access this store.
-
These assets would then be reviewed from a web browser, mobile app or ecommerce integration with access to the assets managed by the virtual staging environment. To make it easy for users, you might want to provide a UI to switch between the staging environment and production. The base domain of the staging URL, for example, zllu2w1z3lx51q8lxlzgzj5gr.staging.bigcontent.io would be used instead of the base URL of the production domain cdn.media.amplience.net. The rest of the URL for an asset will be the same.
-
The workflow video included above shows an example of separate development, staging and production environments that can you switch between simply by changing the base domain in the URL.
-
When requesting an asset with a staging URL, the staging service will check that either the requesting IP address is specified in the white list set up for this environment or the request contains a preview token authorizing access. See the virtual staging authorization for more details.
When everything has been reviewed and approved, the content will be published to production. This might involve running a script to automatically publish everything in the "Launch assets" store, or only those assets updated between certain dates, depending on what business rules you want to implement. The published assets would then be accessed using the production URL.
Note: It is currently not possible to prevent users from publishing from a specific asset store.
ExamplesLink copied!
Here are just some of the ways in which Virtual Staging Environments can adapt to and improve your existing workflow.
Preparing assets for the next seasonLink copied!
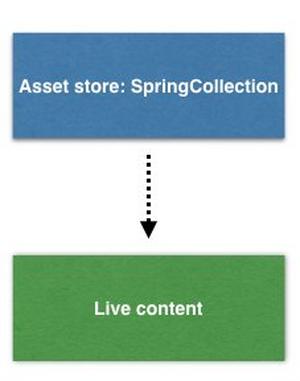
In this example, one team is working on maintaining content on the live site while another is preparing content for the next season. The assets for the next season are uploaded to an asset store in Content Hub named "SpringCollection". A new virtual staging environment is created with rules that specify that assets should first be loaded from the "SpringCollection" store and if this is not found then the asset should be loaded from the live production assets. The team work on the new collection assets within the staging environment and when the work is complete and reviewed, the assets in the "SpringCollection" can then be published to production. The cycle will then continue with the next season's assets.
If an update was required to an asset on the production website, then this could be uploaded to the asset store used for production and then published, but requesting the same asset from within the next season's virtual environment would still return the asset from the "SpringCollection".
Previewing a "hot fix" before productionLink copied!
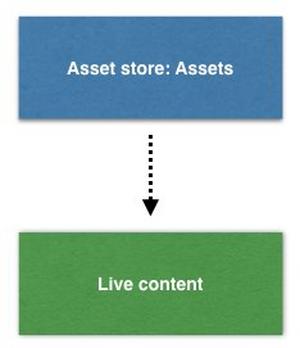
In some cases you might want to preview changes made to a production site before it goes live. One way of doing this would be to create a staging environment with a rule that pulls assets from the asset store used for production assets. In this example, the production assets are stored in the asset store named "Assets".
The updated assets will be uploaded to this store as normal but not published. The staging service pulls the content directly from the asset store, allowing you to review it before it is published to the live site.
Supporting multiple parallel projectsLink copied!
If you have multiple teams working on parallel projects then it's possible to create a staging environment for each team, each with its own rules and its own asset stores. These teams would then be able to work independently of each other and not interfere with any other team's workflow.
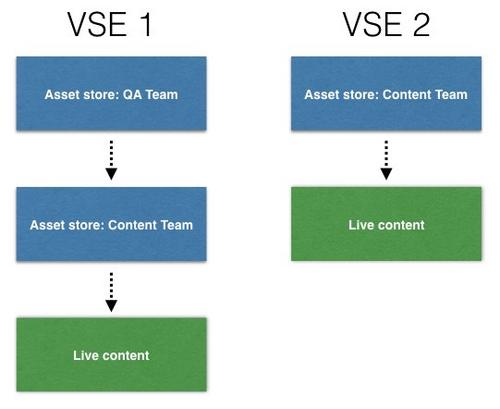
In the example illustrated below, the content team want to be able to preview content before it goes live, while the QA team wants to work in a separate environment to the content team and not interfere with the content team's work. The QA team can create their own VSE, with content rules that specify that assets should first be looked for in the QA Team asset store, then the asset store being worked on by the content team and finally the live production assets. The content team creates their own VSE that just includes that asset store that they are working with and the production assets.
You can create several staging environments and work with them in parallel, providing the flexibility to support many possible business processes.
